How to Configure Apache Web Server Load and Page Statistics
We’re in this article together with another content within the Apache HTTP web server that may produce a Process Managers existence much simpler to address heap associated with Apache web server using mod_status module.
What’s mod_status?
The Status module permits the server supervisor to find how nicely their own server is performing. A new HTML web page will be presented that provides the latest server figures in the easily readable form. mod_status is usually an Apache component which helps you to keep an eye on web server weight as well as latest httpd connections through an HTML user interface which is often available via a browser.
The details given are:
Testing Setting
Operating System – CentOS
WebServer – Apache
IP Address – 192.168.10.30
DocumentRoot– /var/www/html
Apache Configuration file – /etc/httpd/conf/httpd.conf
How to Enable mod_status in Apache
By default in Apache installation mod_status module is enabled, but make sure it is enabled in Apache configuration file at. Follow below steps to check module in enabled or not
# vi /etc/httpd/conf/httpd.conf
Search for the word “mod_status” in Apache Configuration File.
#LoadModule status_module modules/mod_status.so
If you see ‘#‘ character at the start regarding “LoadModule”, which means mod_status is disabled. Remove the ‘#‘ to enable mod_status.
LoadModule status_module modules/mod_status.so
Configure mod_status
To configure mod_status we need to search for the word “server-status” in Apache Configuration File
# Allow server status reports generated by mod_status,
# with the URL of http://servername/server-status
# Change the ".example.com" to match your domain to enable.
#
# <Location /server-status>
#    SetHandler server-status
#    Order deny,allow
#    Deny from all
#    Allow from .example.com
# </Location>
Remove the ‘#‘ to configure mod_status.
# Allow server status reports generated by mod_status,
# with the URL of http://servername/server-status
# Change the ".example.com" to match your domain to enable.
#
<Location /server-status>
   SetHandler server-status
   Order allow,deny
   Deny from all
   Allow from 192.168.10.
</Location>
Note: The above mentined configuration will be the default configuration with regard to default Apache web site (single website).
To add more information to the statistics page like, CPU usage, request per second, total traffic, etc so search one more word ‘ExtendedStatus”in Apache Configuration File and uncomment it.
# ExtendedStatus controls whether Apache will generate "full" status
# information (ExtendedStatus On) or just basic information (ExtendedStatus
# Off) when the "server-status" handler is called. The default is Off.
#
ExtendedStatus On
Configure server-status of domain
If you have enabled status reports only for any particular domain from your browser add this code to your Apache configuration file.
<Location /server-status>
    SetHandler server-status
    Require host techoism.com
</Location>
Restart Apache
Before restarting the Apache Server make sure all the apache configuration is correct using following command:
# httpd -t
Syntax OK
Once, you get syntax is OK, you can restart the httpd service.
service httpd restart
Stopping httpd:                                          [  OK  ]
Starting httpd:                                          [  OK  ]
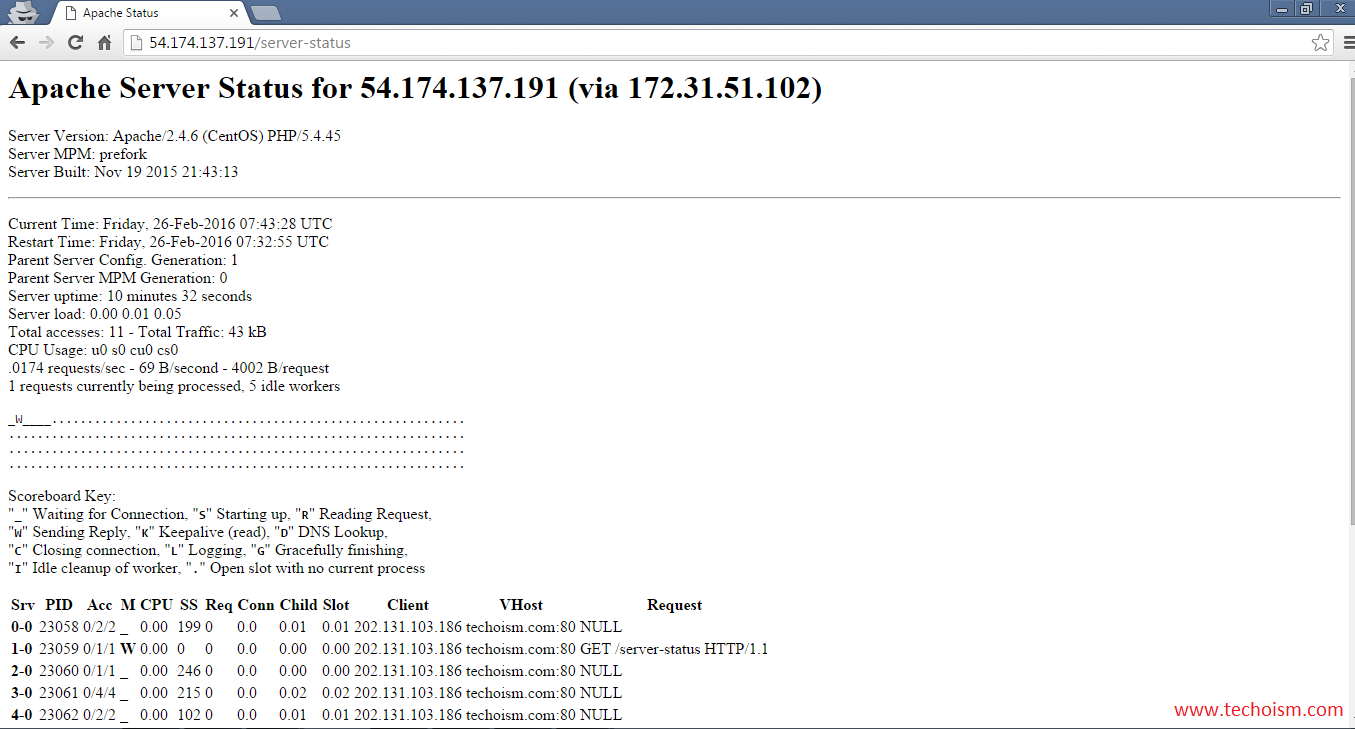
Check server-status via browser:
http://server-ip/server-status
OR
http://server-hostname/server-status