How to create Apache Virtual Host on Ubuntu
Apache is the most well known web server on the Internet. It is used to serve more than half of every single dynamic site. Virtual Hosts are utilized to setup more than one domain or sites utilizing a single IP address. This is exceptionally valuable on the off chance that anyone needs to run multiple sites using a single IP address on single VPS.
See Also:

Step #1: Install Apache WebServer
Before installing Apache WebServer, let us update our Ubuntu server:
# sudo apt-get update
Now Install Apache WebServer on Ubuntu system, If it’s not install run below command:
# sudo apt-get install apache2
Step #2: Create DocumentRoot
First you need to create a directory where you will keep the new website code.
# sudo mkdir -p /home/techoism/public_html
Step #3: Set Ownership and Permission
We have to grant ownership for directory to the user, We should change the ownership of directory to the regular user.
# sudo chown -R techoism:techoism /home/techoism/public_html
Moreover, it is important to verify that everybody will have the able to read our new files.
# sudo chmod -R 755 /home/techoism/public_html
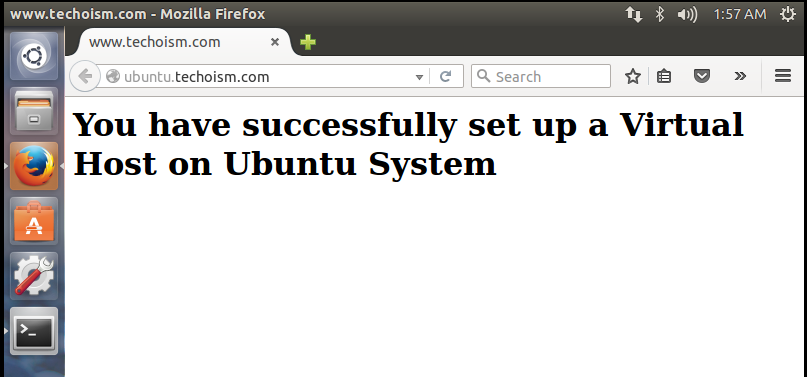
Step #4: Create the Sample Page
Create a sample index file for testing purpose in document root.
# sudo cd /home/techoism/public_html
# sudo vim index.html
<html>
  <head>
    <title>www.techoism.com</title>
  </head>
  <body>
    <h1>You have successfully set up a Virtual Host on Ubuntu System</h1>
  </body>
</html>
Step #5: Turn on Virtual Host
Now Edit the apache configuration file and make the below changes.
# sudo vim /etc/apache2/sites-available/techoism.conf
Add the below lines at the end of the page:
<VirtualHost *:80>
    ServerAdmin dennis.r@techoism.com
    DocumentRoot /home/techoism/public_html
    ServerName ubuntu.techoism.com
    ErrorLog ${APACHE_LOG_DIR}/error.log
    CustomLog ${APACHE_LOG_DIR}/access.log combined
<Directory "/home/techoism/public_html">
    Options Indexes FollowSymLinks
    AllowOverride All
    Order allow,deny
    Allow from all
    Require all granted
</Directory>
</VirtualHost>
Step #6: Enable Virtual Host
After modifying the virtual hosts files, disable the default virtual host (000.default.conf), and enable new virtual hosts as shown below.
# sudo a2dissite 000-default.conf
# sudo a2ensite techoism.conf
Step #7: Restart Apache WebServer
Now restrat Apache WebServer.
For Ubuntu 15.10/15.04
# sudo systemctl restart apache2
For Ubuntu 14.10 and earlier version
# sudo service apache2 restart
Step #8: Verify the Configuration
Now you can verify the configuration on your browser by running below domain:
http://ubuntu.techoism.com
Enjoy it!
