How to configure Squid on Ubuntu with Authentication
Squid is a free & open-source full featured web proxy cache server, which can be used in many other ways like It redirects client requests from web browsers to the proxy server and delivers the client’s requests and keeps a copy of them in the proxy hard disk cache. Squid program does not requires intensive CPU usage. To increase efficiency, would recommend to buy faster disks or add more memory into the squid proxy server.
Install Squid3:
Installation of Squid Proxy server on Ubuntu and Debian is very easy, only you have to run the following command.
# sudo apt-get install squid3 -y
Configure Squid3:
Depending on the version installed on your system you have to look for a specific path.
# sudo vi /etc/squid3/squid.conf
Define allowed LAN segment (Around line 919):
..
acl techoism_lan src 192.168.0.0/24
..
Allow defined LAN (Around line 1058):
..
http_access allow techoism_lan
..
Listen on port 3128:
..
# Squid normally listens to port 3128
http_port 3128
..
Configure Squid with Authentication:
This step is for authenticating User , Mean Whenever user trying to access outside Network , It will ask for entering User’s name ( Whichever we want to set ) and password.
First Install the program ‘htdigest’ using following command:
# sudo apt-get install apache2-utils -y
User for authentication:
sudo htdigest -c /etc/squid3/passwords realm_name user_name
Example:
# sudo htdigest -c /etc/squid3/passwords proxyuser dennis
Add digest squid authentication configuration (At line 335-337).
auth_param digest program /usr/lib/squid3/digest_file_auth -c /etc/squid3/passwords
auth_param digest realm proxyuser
acl techoism_authenticate proxy_auth REQUIRED
http_access allow techoism_authenticate
Note: Please note that the file digest_pw_auth has been renamed to digest_file_auth in ubuntu 14.04 LTS.
Start Service:
Restart the Squid to take affect the new configuration :
# sudo initctl restart squid3
or
# sudo service squid3 restart
Check Squid Port
Verify port 3128 are listening or not:
# sudo netstat -plunt | grep 3128
tcp6       0      0 :::3128                 :::*                    LISTEN      2185/squid3
Verify the Version:
Use the following command to check the version of Squid and the configuration options it was started with:
# squid3 -v
Squid Cache: Version 3.3.8
Ubuntu
configure options:  '--build=x86_64-linux-gnu' '--prefix=/usr' '--includedir=${prefix}/include' '--mandir=${prefix}/share/man' '--infodir=${prefix}/share/info' '--sysconfdir=/etc' '--localstatedir=/var' '--libexecdir=${prefix}/lib/squid3' '--srcdir=.' '--disable-maintainer-mode' '--disable-dependency-tracking' '--disable-silent-rules' '--datadir=/usr/share/squid3' '--sysconfdir=/etc/squid3' '--mandir=/usr/share/man' '--enable-inline' '--enable-async-io=8' '--enable-storeio=ufs,aufs,diskd,rock' '--enable-removal-policies=lru,heap' '--enable-delay-pools' '--enable-cache-digests' '--enable-underscores' '--enable-icap-client' '--enable-follow-x-forwarded-for' '--enable-auth-basic=DB,fake,getpwnam,LDAP,MSNT,MSNT-multi-domain,NCSA,NIS,PAM,POP3,RADIUS,SASL,SMB' '--enable-auth-digest=file,LDAP' '--enable-auth-negotiate=kerberos,wrapper' '--enable-auth-ntlm=fake,smb_lm' '--enable-external-acl-helpers=file_userip,kerberos_ldap_group,LDAP_group,session,SQL_session,unix_group,wbinfo_group' '--enable-url-rewrite-helpers=fake' '--enable-eui' '--enable-esi' '--enable-icmp' '--enable-zph-qos' '--enable-ecap' '--disable-translation' '--with-swapdir=/var/spool/squid3' '--with-logdir=/var/log/squid3' '--with-pidfile=/var/run/squid3.pid' '--with-filedescriptors=65536' '--with-large-files' '--with-default-user=proxy' '--enable-linux-netfilter' 'build_alias=x86_64-linux-gnu' 'CFLAGS=-g -O2 -fPIE -fstack-protector --param=ssp-buffer-size=4 -Wformat -Werror=format-security -Wall' 'LDFLAGS=-Wl,-Bsymbolic-functions -fPIE -pie -Wl,-z,relro -Wl,-z,now' 'CPPFLAGS=-D_FORTIFY_SOURCE=2' 'CXXFLAGS=-g -O2 -fPIE -fstack-protector --param=ssp-buffer-size=4 -Wformat -Werror=format-security'
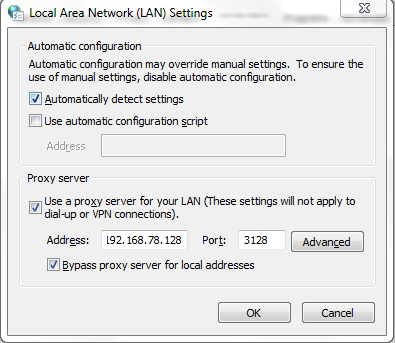
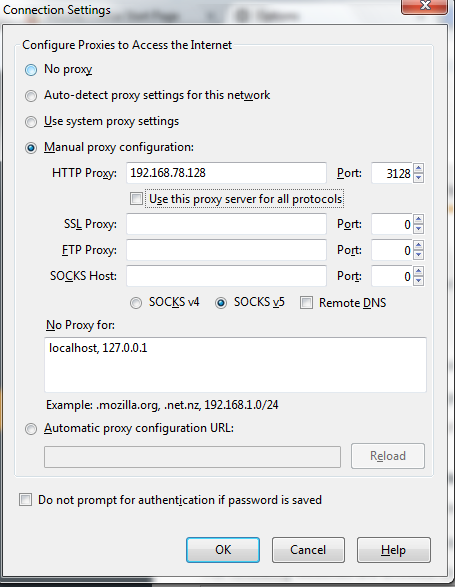
Configure Proxy on Client:
Configure at proxy setting at client’s browser as below :
Chrome:
Setting > Change Proxy Settings > Lan Settings > check proxy server > advanced
Tools > Option > Advanced > Network > Settings
You can also check squid log
# sudo tail -f /var/log/squid3/access.log
1441607335.740      0 192.168.243.130 TCP_DENIED/407 3866 CONNECT safebrowsing.google.com:443 - HIER_NONE/- text/html
1441607335.985      0 192.168.243.130 TCP_DENIED/407 3866 CONNECT self-repair.mozilla.org:443 - HIER_NONE/- text/html
1441607339.307      0 192.168.243.130 TCP_DENIED/407 3947 GET http://google.com/ - HIER_NONE/- text/html
1441607365.995      0 192.168.243.130 TCP_DENIED/407 3866 CONNECT self-repair.mozilla.org:443 - HIER_NONE/- text/html
1441607370.140    140 192.168.243.130 TCP_MISS/302 660 GET http://google.com/ dennis HIER_DIRECT/216.58.196.14 text/html
1441607370.455    308 192.168.243.130 TCP_MISS/302 1103 GET http://www.google.co.in/? dennis HIER_DIRECT/216.58.196.3 text/html
1441607371.906    367 192.168.243.130 TCP_MISS/200 900 POST http://clients1.google.com/ocsp dennis HIER_DIRECT/216.58.196.14 application/ocsp-response
1441607395.781      0 192.168.243.130 TCP_DENIED/407 3866 CONNECT safebrowsing.google.com:443 - HIER_NONE/- text/html
..
..
See Also:
How to configure Squid Proxy on Ubuntu/Debain
How to configure Squid on CentOS/RHEL
Enjoy it!

thank U