How to install Check_mk Agent in CentOS 6/7/8
Now we will add a Linux host (CentOS/RHEL 6/7/8), To add any Linux host to Check_MK we require to install Check_mk Agent. Check_mk agent package can be downloaded from OMD instance or ChecK_MK Server from URL:
http://server_IP/techoismmonitor/check_mk/agents/
This article will help you to install check_mk agent in CentOS 6/7/8
Step 1: Disable SELinux
Check SELinux status and disable it if it’s enabled.
# getenforce
Edit SELinux configuration file and change the status If SELinux is enabled.
# vim /etc/sysconfig/selinux
Change SELINUX=enforcing to SELINUX=disabled
After changing the SELinux status we need to reboot the server.
# reboot
Step 2: Add EPEL Repository
We need to install EPEL repository, as some of the Check_MK packages are not available in default repository.
For CentOS/RHEL 6/7
# yum install epel-release
For CentOS/RHEL 8
# dnf install epel-release
Step 3: Install Check_MK Agent
We need to download the check_mk agent from the check_mk server. In my case the URL will be as below:
http://172.20.10.8/techoismmonitor/check_mk/agents
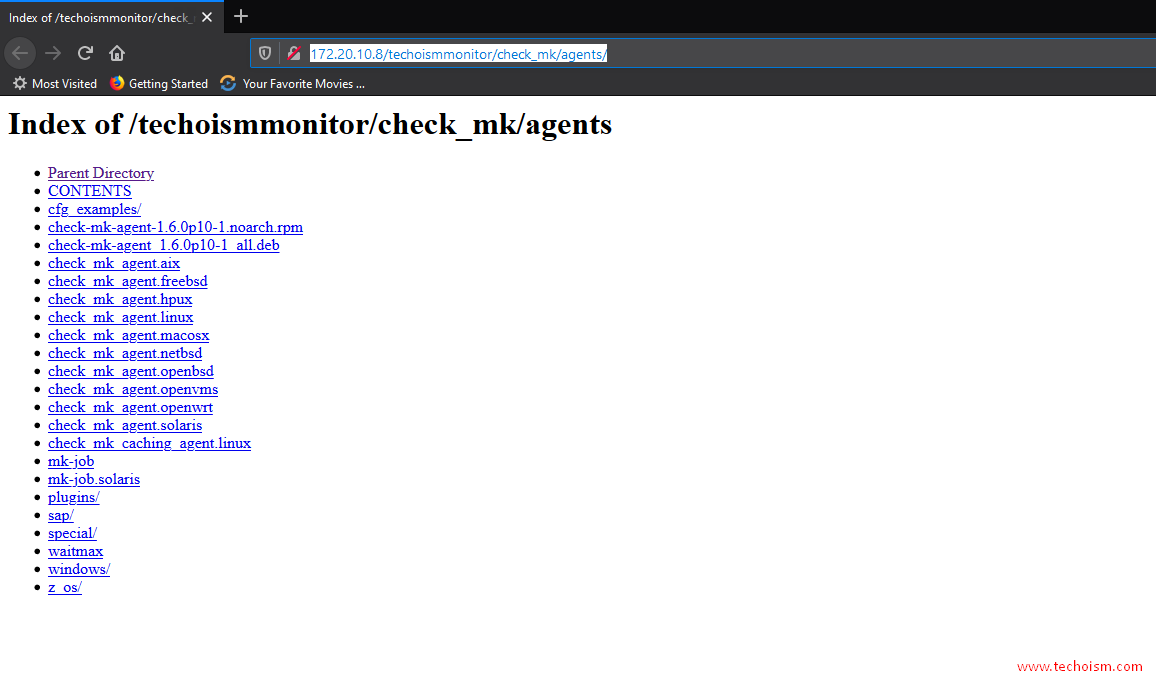
Download the check_mk agent using mention command.
# wget http://172.20.10.8/techoismmonitor/check_mk/agents/check-mk-agent-1.6.0p10-1.noarch.rpm
Now you are good to install the check_mk agent into the client server.
For CentOS/RHEL 6/7
# yum install check-mk-agent-1.6.0p10-1.noarch.rpm
For CentOS/RHEL 8
# dnf install check-mk-agent-1.6.0p10-1.noarch.rpm
Now you have successfully installed the check_mk agent.
Reference:
https://checkmk.com/cms_wato_monitoringagents.html
Enjoy it!

To install the Check_MK agent on CentOS 6, 7, or 8, you can follow these general steps. Please note that the Check_MK agent is typically installed on the target system that you want to monitor.
For CentOS 6/7/8:
Download the Agent:
Visit the official Check_MK website or use your preferred package manager to download the agent package. The agent package is usually named something like check-mk-agent.
Install the Agent:
Use the package manager for your CentOS version to install the Check_MK agent. For example, with yum on CentOS 6/7 or dnf on CentOS 8:
bash
Copy code
# For CentOS 6/7
sudo yum install check-mk-agent
# For CentOS 8
sudo dnf install check-mk-agent
Configuration:
The Check_MK agent configuration file is usually located at /etc/check_mk/agent.cfg. Open this file in a text editor, and adjust any settings if necessary.
Start the Agent:
Start the Check_MK agent service:
bash
Copy code
# For CentOS 6/7
sudo service xinetd restart
# For CentOS 8
sudo systemctl restart xinetd
Firewall Configuration (if needed):
If you have a firewall enabled, make sure to allow traffic on the port used by the Check_MK agent (default is 6556). You can do this using iptables or firewalld depending on your CentOS version.
bash
Copy code
# Example for firewalld
sudo firewall-cmd –zone=public –add-port=6556/tcp –permanent
sudo firewall-cmd –reload
Test the Agent:
You can test the agent by connecting to it from the Check_MK server. On the Check_MK server, use the following command to test the connection:
bash
Copy code
cmk -d
Replace with the actual IP address or hostname of the system where you installed the Check_MK agent.
These steps should help you install and configure the Check_MK agent on CentOS 6, 7, or 8. Keep in mind that specific details might vary depending on the Check_MK version and the configuration of your environment. Always refer to the official Check_MK documentation for the most accurate and up-to-date information.