How to Install Docker Engine on Ubuntu 19.10/18.04
Docker is a tool that allows you to easily build, test and deploy applications smoothly and quickly using containers. Containers allow a developer to package an application with its dependencies and ship it out as a single package. Docker provides a more efficient and lightweight environment to deploy the application.
Useful Articles:
- WHAT IS DOCKER & DOCKER CONTAINER?
- HOW TO INSTALL DOCKER ENGINE ON CENTOS/RHEL 8
- HOW TO INSTALL DOCKER CE ON CENTOS/RHEL 7/6
- HOW TO INSTALL DOCKER ON UBUNTU 18.04 & 16.04 LTS
- WHAT IS DOCKERFILE AND BASICS OF DOCKERFILE
- INSTALLATION OF DOCKER FAILS ON CENTOS 8 WITH ERROR – PACKAGE CONTAINERD.IO-1.2.10-3.2.EL7.X86_64 IS EXCLUDED
- SOME BASIC DOCKER COMMANDS BEGINNER SHOULD KNOW
In this tutorial helps you to install Docker on Ubuntu 19.10/18.04
Step 1: Uninstall Old Versions
If old version of Docker is installed in your system then please remove it and it’s dependencies before proceeding with the installation.
$ sudo apt remove docker docker-engine docker.io containerd runc
Step 2: Add Docker Repository
Run the following command which will add the Docker repository to your system:
First, update the apt package index and install packages to allow apt to use a repository over HTTPS
$ sudo apt update
$ sudo apt install \
    apt-transport-https \
    ca-certificates \
    curl \
    gnupg-agent \
    software-properties-common
Add Docker’s official GPG key:
$ curl -fsSL https://download.docker.com/linux/ubuntu/gpg | sudo apt-key add -
Verify that you now have the key with the fingerprint 9DC8 5822 9FC7 DD38 854A E2D8 8D81 803C 0EBF CD88.
$ sudo apt-key fingerprint 0EBFCD88

Use the following command to set up the stable repository.
$ sudo add-apt-repository \
   "deb [arch=amd64] https://download.docker.com/linux/ubuntu \
   $(lsb_release -cs) \
   stable"
Step 3: Install Docker Engine
Docker engine official repository is now available in your system. Now you can install the Docker using the following command
$ sudo apt-get update
$ sudo apt-get install docker-ce docker-ce-cli containerd.io
Step 4: Install Specific Versions Docker Engine
To install a specific version of Docker Engine, list the available versions in the repo, then select and install:
List and sort the versions available in your repo.
$ apt-cache madison docker-ce

Install a specific version by its fully qualified package name.
$ sudo apt-get install docker-ce=<VERSION_STRING> docker-ce-cli=<VERSION_STRING> containerd.io
Step 5: Start Docker
After, Docker package has been installed, start the docker service and enable it at boot time using the below commands:
# systemctl enable docker
# systemctl start docker
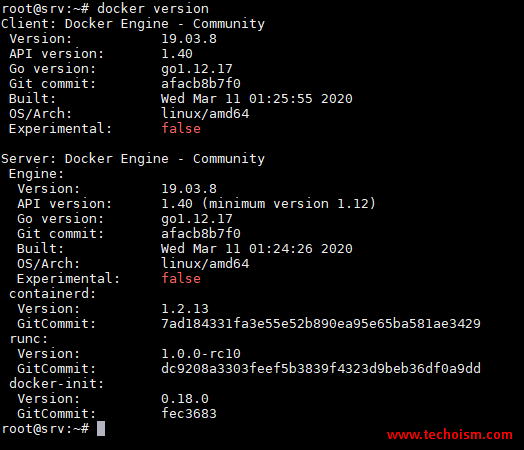
Step 6: Check Docker Version
Run mention command to check the docker version.
# docker version
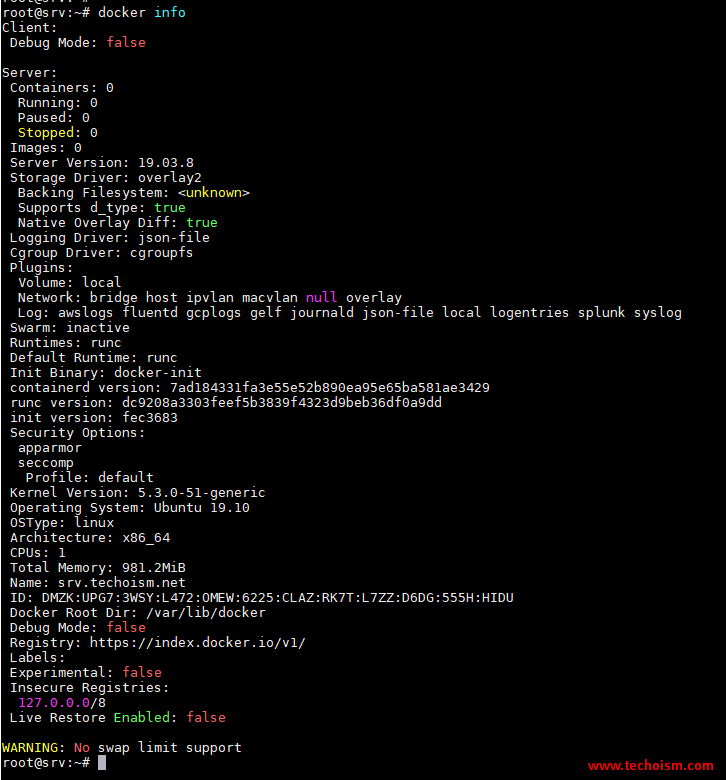
Step 7: Check Docker Info
Now, you can check some docker info using mention command.
# docker info
Step 8: Verify that Docker Engine
Verify that Docker Engine is installed correctly by running the following command.
# docker run hello-world

Reference:
Enjoy it!
